TUTORIAL: UMBRELLA TOPPERS
- Jul 1, 2025
- 6 min read
Updated: Aug 21, 2025
These adorable umbrella toppers can be decorated in any way you like and are sure to bring a smile, even on the rainiest of days.

In this step-by-step guide, I’ll show you how to make the rainbow fade umbrella.
Before you begin: It’s best to create these in stages—first, shape the umbrella and cover the cocktail stick (Steps 1–4), then allow the paste to completely harden before moving on.

🧰 You will need:
Gum paste (flower paste)
8 x coloured dusts & brushes to apply
Cocktail sticks
Ruler
Circle cutters: 11cm, 5cm, 1.5cm
Cupcake foam dome / polystyrene ball (for drying)
Fine paintbrush & a little water
Rolling pin
Note: Circle cutter sizes are approximate—don’t worry if yours aren’t exact.
STEP 1: Cut and Mark a Circle

Roll out some gum paste to approximately 4mm thick and cut out a circle using an 11cm cutter. Use the edge of a ruler to mark 8 equal sections. Avoid pressing too hard, as this may weaken the structure once dry.
Pro Tip: If you have an octagonal bunting cutter (many people do), you can use it to mark the lines instead. It won’t give exactly the same result, (an example of this is shown in Step 5), but it’s quicker—so it's useful if you’re making several umbrellas.
STEP 2: Create the Umbrella

A. Use a 5cm cutter to trim each section where the paste meets the segment lines, as shown.

B: You’ll end up with a shape similar to this.
STEP 3: Shape the Umbrella

A. Place the gum paste shape centrally on the foam dome. It should naturally curve without too much effort—be gentle when smoothing downwards to avoid distorting the shape.

B. Where all the segment lines meet at the top, use a cocktail stick or thick needle tool to make a hole. Leave the shape to dry completely.
NOTE: You can, of course, make the hole and then flip the shape before drying, so no segment marks show on top of the umbrella. Doing this can sometimes make it a little fiddly to shape when placed on the foam dome. As the marks will be covered up later, it’s not always worth the extra faff. But go with whatever suits you best.
STEP 4: Cover the Cocktail Stick

A. Roll a small piece of gum paste into a short sausage (Use any colour you like. I used black as I wanted to paint it gold when it had dried).
B. Lightly brush the cocktail stick with water and dab off any excess.

C. Gently twist the gum paste down the stick using your thumb and forefinger.
D. Roll on your worksurface, until the cocktail stick is evenly coated in a thin layer of paste. Trim away any excess from both ends as you go along.
Once the stick is covered, trim a little paste from one end to leave the point exposed—this is the end that will be inserted into the umbrella. Set aside on drying foam to harden.
Pro Tip: If you’re finding it tricky to get the paste even, do the rolling on a foam pad—it’s much easier!
STEP 5: Dusts for the Rainbow

A. The marks shown here were made using an octagonal bunting cutter (see Step 1).
B. I find that deeper-coloured dusts work best for a fade effect but use whatever brands and colours you prefer.
For this umbrella, I used:
Rainbow Dust: Cherry Pie, Navy Blue
Sugarflair: Sunset Orange, Lemon Yellow, Emerald, Peacock
Edible Art: Peony Rose
Magic Colours: Deep Purple
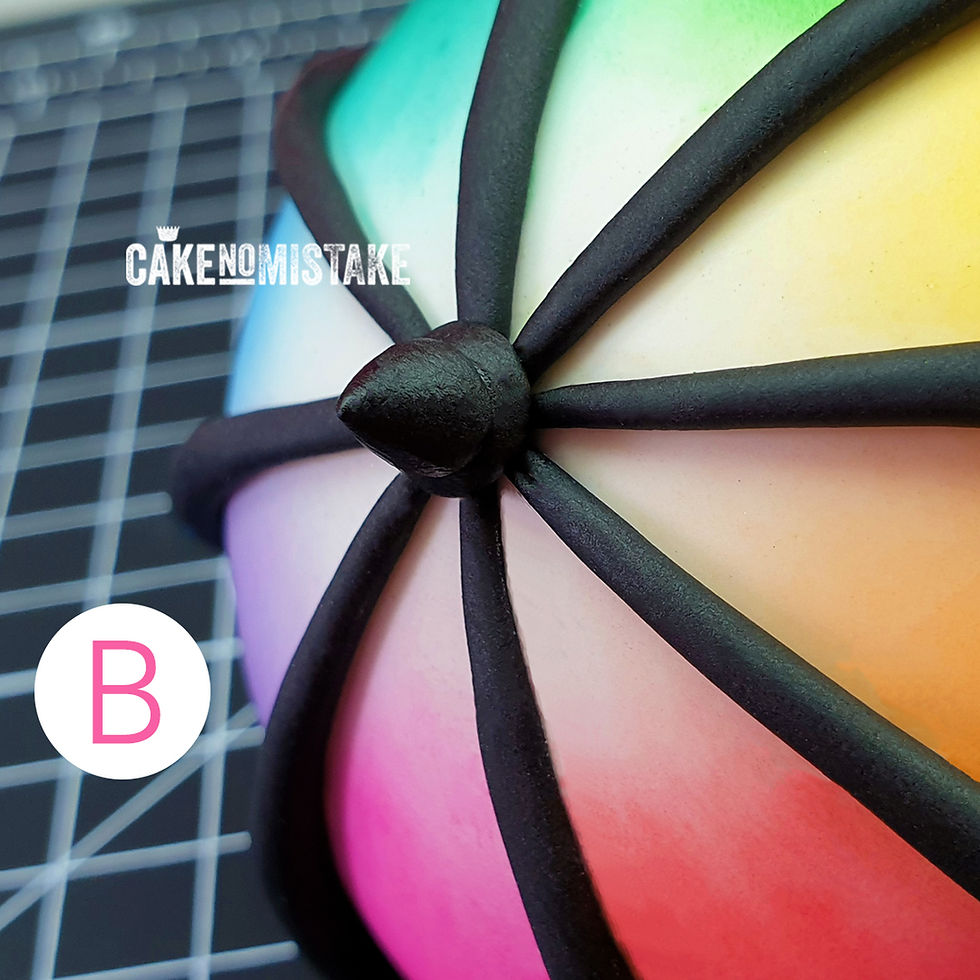
STEP 6: Shade the Umbrella

A: Using a soft-bristle brush, start at the base of each segment. Create the fade by angling the brush to catch more colour around the curve. Don’t dust the entire segment—just brush upwards, always starting at the base, in short, gentle sweeps.

B: Continue adding colours until the rainbow is complete.
STEP 7: Create the Spokes

A: Roll out some gum paste to 1–2mm thick in your chosen colour. Use a small (approx. 1.5cm) cutter to cut 8 circles for even sizing—you could weigh each one if you prefer, but that takes a little longer. Roll each circle into a ball, then into cone. Keep rolling the cone until you have a long teardrop.

B: Each spoke should be long enough to reach from the centre of the umbrella shape, to just past the point at the base.
STEP 8: Attach the Spokes

A: Brush a thin line of water along a segment line and attach the first spoke. Gently pinch the thicker end of the spoke between your thumb and forefinger, applying slight pressure to ensure it's securely attached at the point.
PRO TIP: Keep the water line very thin, as water can remove or drag the dust when applied. A fine line ensures that the spoke will cover any marks.

B: Repeat until all spokes are attached.
NOTE: If any spokes have covered the hole on the top of the umbrella, make sure you re-poke it gently before the spokes start to harden. This avoids damaging your work when inserting the handle later.
STEP 9: Create the Handle

A. Roll a small sausage of gum paste (approx. 3.5cm long, 0.5cm thick).
Because it’s such a small piece, I find it helps to make a hole in one end with a cocktail stick before moving on—anything that makes fiddly tasks easier is worth doing.
Next, lightly brush the tip of your covered cocktail stick with water, then dab off any excess. Insert it into the sausage shape, about 1cm deep, using the pre-made hole as a guide.

B: Roll gently where the paste meets the stick to secure the join - and smooth out the bulge.

C: Gently curve the other end to form the crook. Trim if needed.
STEP 10: Attach the Handle

A. Roll a small cone of gum paste.

B. Use a cocktail stick to poke a hole through the cone, from point to base. Brush a little water onto the wide, flat end of the cone, then attach it to the underside of the umbrella—making sure the cone hole lines up with the hole in the umbrella.
Once it’s in position, brush a small amount of water inside the cone hole. Then insert the handle so that the point of the cocktail stick peeks out the top of the umbrella.
Pro Tip: Struggling to align the holes? Try leaving the cocktail stick in place after making the hole in the cone. This will help with positioning. Once the cone is attached, gently remove the stick and insert the handle as described.
STEP 11: Add the Ferrule

A: Roll a small ball and a small teardrop of gum paste.
B. Brush the exposed tip of the cocktail stick with a little water and press the ball onto it. Then attach the teardrop on top of the ball to complete the ferrule.
Pro Tip: If you don’t want your umbrella to have a pointy ferrule, just roll a slightly larger ball instead. When attaching it, gently press down so it flattens out a little—this gives a softer, rounded finish. Depending on your design, this variation may be more useful if you’re planning to display your umbrella upside down.
If you think the point of the cocktail stick will show, just nip off the point with wire cutters and then attach the ball as described above.
🕊 DRYING TIPS
The topper should now be left to dry completely.
Don’t lay the umbrella on its side or apply pressure to the handle until the cone has fully hardened.
To keep the handle straight while drying, turn the umbrella upside down and rest it on egg box foam. Gently position the ferrule into one of the dimples—this supports the umbrella without squashing the ferrule or putting pressure on the handle.
📏 GO LARGE?
I’ve made larger versions of these for centrepieces and keepsake toppers—and the method above still works beautifully. However, if you’re scaling up, I do recommend swapping the cocktail stick for something stronger. Trimmed wooden or bamboo skewers work a treat.
💡 GET CREATIVE
These umbrellas make an eye-catching addition to your novelty cake and sugarcraft projects. It’s easy to customise the colours and add details to match your theme.
If you want something a little extra, try displaying your ‘brolly upside down and filling it with yummy things. Here are a few of the things I’ve tried:
Go elegant – fill with delicate sugar flowers
Go silly – fill with jelly beans (highly recommended—great for birthdays)
Go full choccy – fill with mini eggs (also highly recommended—perfect for Easter, or if you’re a mini egg freak like me)
Go festive – fill with mini candy canes, gold sugar balls and tiny gingerbread men sprinkles, (Wilton sell these - and they are so cute).
☀️ WEATHER OPTIONAL
For those who’d rather skip the stormy weather, this method works just as well for sunny-day parasols.
As you can see from my example below, I went full Bridgerton... and I make no apologies for that.

⚠️ SAFETY FIRST: Make sure that your guests / customers are aware that this cake topper contains a cocktail stick. We don't want any accidents.
🎉 I’d love to see what you make!
I hope you found this tutorial helpful :) If you give it a try—let me know!


Beautiful !!! thanks for sharing :-)