TUTORIAL: SLEEPY BEE TOPPERS
- Jun 4, 2023
- 3 min read
Updated: Aug 21, 2025
There’s nothing quite like the gentle buzz of bees to let you know summer has truly arrived!

These sleepy bee toppers are a great way to add character and cuteness to your cupcakes. They’re simple to make and are guaranteed to brighten up summer dessert tables, birthday parties, sunny picnics, or even afternoon tea in the garden.
This easy-to-follow tutorial takes you through each step – no fancy equipment and no tricky techniques!
Equipment:
Strip cutter / sharp knife and ruler
Rolling pin
Water / edible glue
Circle cutters: approx. 7cm, 2.5cm, 1.5cm, 0.7cm
Small heart cutter (for wings)
Dresden tool
Edibles:
Modelling paste in black, white, pink, yellow and red
2 x black sugar pearls (approx. 4mm) — or use small balls of black paste
Edible dusts: Yellow & Orange
Note: I used modelling paste for this project as it sets up faster. If you're using sugar paste, you can add a little CMC to speed up drying.
STEP 1: Prepare the Discs

A. Roll out yellow paste approx. 3–4mm thick and cut strips about 0.5cm wide. You’ll need four strips per topper.
B. Roll out black paste to the same thickness.
PRO TIP: If you're making lots of these, roll larger pieces of paste and cut longer strips. You will then be able to cut 3–4 discs at once.
STEP 2: Adding the Stripes

Brush the back of each yellow strip with a thin line of water and attach them evenly across the black paste.
PRO TIP: You can use extra strips as spacers to keep the gaps even and consistent.
STEP 3: Cutting the Discs

Use the 7cm cutter to cut cleanly through both pastes. Leave slightly more black paste at the front edge for the face detail (as shown above).
STEP 4: Make the Eyes

A. Roll out a small amount of white paste approx. 5–6mm thick. Cut two eye whites using a 1.5cm cutter.
B. Press a sugar pearl into the centre of each eye. Use a little water/glue if needed.
C. Roll yellow paste thinly, cut 2.5cm circle, then halve. Stick each semi-circle just above the sugar pearl to form eyelids. Smooth neatly around the eye.
D. Roll two thin sausages of black paste and taper at both ends. Use water or a little glue to attach just below the eyelids. Curl the outer point upwards.
STEP 5: Make the Wings, Sting, Smile & Cheeks

A. Roll out a small amount of white paste (2mm thick). Cut two hearts for the wings. Use a Dresden tool to add texture, then pinch together at the pointed end.
B. Roll a small black ball, then taper one end into a point for the sting. Flatten the rounded end.
C. Shape a tiny sausage of red paste with tapered ends and curve into a smile.
D. Thinly roll a small piece of pink paste and cut two small circles using the 0.7cm cutter. If your paste is still warm, it may help to set these elements aside to firm up slightly before continuing.
STEP 6: Attach the Face

A. Use water or glue to attach the pink cheeks near the bottom edge of the black disc.
B. Then attach the eyes and smile.
STEP 7: Add the Sting & Wings

A: Stick the flattened part of the sting to the underside back edge of the topper using a little water.
B: Gently bend the pointed part of the wing back on itself. Brush this part with a little water or edible glue, then gently press down onto the topper. PRO TIP: If needed, use small balls of dry paste or kitchen paper to hold the wings up while they harden.
STEP 8: Add Final Colour
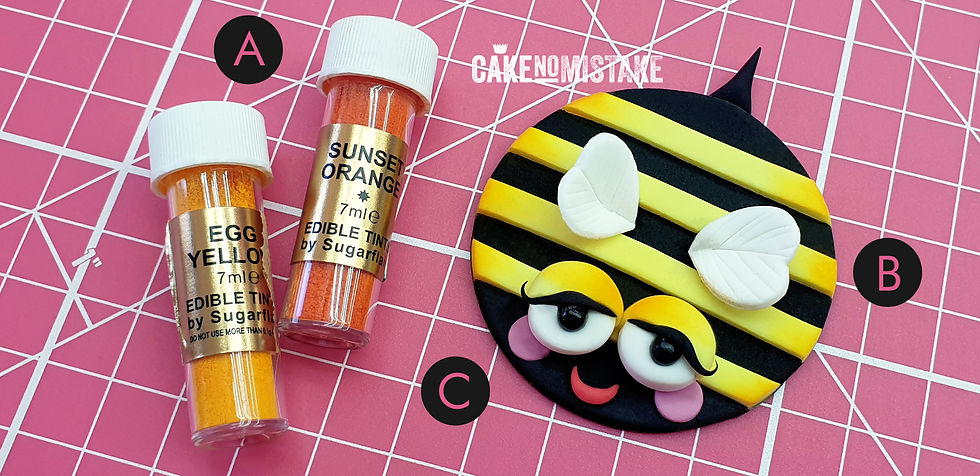
A: Choose a yellow and an orange edible dust for the eyes and stripes. I used Sugarflair Lemon Yellow and Sunset Orange.
B: Use the yellow to dust two-thirds of each eyelid starting from the inner corners. Then gently brush the bee stripes from outer edge towards the centre (but don't go right to the middle).
C. Dust a little orange on the inner corners of the eyelids and the extreme ends of each of the stripes.

I hope you enjoyed this tutorial!
Got an idea for another cupcake topper you'd like to see? Let me know!


Comments